Tuesday, February 28, 2017

Little Note

= Little Note =

ifconfig wlan0 | grep "inet " | awk -F'[: ]+' '{ print $ 4 }'
iwinfo |grep "Link Quality" |cut -d: -f3
echo "currentsong" | nc localhost 6600 |grep -e "file"
echo "currentsong" | nc localhost 6600 |grep -e "file" |cut -d'.' -f2

Friday, May 27, 2016

Grab MPD status

Grab MPD status


install MPC
set bind address on mpd.conf to "0.0.0.0"

run command

echo "currentsong" | nc localhost 6600 | grep - e "^Title: " -e "^Name: "

echo "currentsong" | nc localhost 6600 | grep -e "^Name: "|cut -d: -f2
echo "currentsong" | nc localhost 6600 |grep -e "Name"|cut -d: -f2


example

root@OpenWrt:/mnt/data/mp3/slow# echo "currentsong" | nc localhost 6600 | grep -
e "^Title: " -e "^Name: "


Result
Title: Mark Blee - MOVIN' ON! 23.05.16 - Mark Blee - MOVIN' ON! 23.05.16
Name: SOULPOWER-RADIO.COM
root@OpenWrt:/mnt/data/mp3/slow#


MPD on OpenWRT

MPD on OpenWRT

Step :

1. exroot
2. install soundcard driver

# Opkg install kmod-sound-core kmod-usb-audio alsa-utils
3. Install MPC and MPD

# Opkg install mpd mpc alsa-utils

4. Edit mpd.conf file

music_directory         "/mnt/data/mp3"
playlist_directory              "/mnt/data/mpd/playlists"
db_file                 "/mnt/data/mpd/database"
log_file                        "/mnt/data/mpd/log"
pid_file                        "/mnt/data/mpd/mpd.pid"
state_file                      "/mnt/data/mpd/state"
bind_to_address         "0.0.0.0"
port                            "6600"
log_level                       "default"
gapless_mp3_playback           "yes"
save_absolute_paths_in_playlists        "yes"
metadata_to_use "artist,album,title,track,name,genre,date,composer,performer,dis
auto_update     "yes"
auto_update_depth "0"
follow_outside_symlinks "yes"
follow_inside_symlinks          "yes"
password                        "password@read,add,control,admin"
default_permissions             "read,add,control,admin"
input {
        plugin "curl"
}
# An example of an ALSA output:
#
audio_output {
        type            "alsa"
        name            "My ALSA Device"
        format          "44100:16:2"
        device          "hw:0,0"        # optional
        mixer_type      "software"      # optional
        mixer_device    "default"       # optional
        mixer_control   "software"              # optional
        mixer_index     "0"             # optional

}


goto  file /etc/init.d/mpd
change
 [ -x /usr/bin/amixer ] && /usr/bin/amixer set PCM 40
 to
[ -x /usr/bin/amixer ] && /usr/bin/amixer set Speaker 150

Friday, April 22, 2016

Arduino with RFID

Arduino with RFID


#include
#include

#define uchar unsigned char
#define uint unsigned int

//4 bytes tag serial number, the first 5 bytes for the checksum byte
uchar serNumA[5];

uchar fifobytes;
uchar fifoValue;

AddicoreRFID myRFID; // create AddicoreRFID object to control the RFID module

/////////////////////////////////////////////////////////////////////
//set the pins
/////////////////////////////////////////////////////////////////////
const int chipSelectPin = 10;
const int NRSTPD = 9;

//Maximum length of the array
#define MAX_LEN 16

void setup() {                
   Serial.begin(9600);                        // RFID reader SOUT pin connected to Serial RX pin at 9600bps 

  // start the SPI library:
  SPI.begin();
  
  pinMode(chipSelectPin,OUTPUT);              // Set digital pin 10 as OUTPUT to connect it to the RFID /ENABLE pin 
    digitalWrite(chipSelectPin, LOW);         // Activate the RFID reader
  pinMode(NRSTPD,OUTPUT);                     // Set digital pin 10 , Not Reset and Power-down
    digitalWrite(NRSTPD, HIGH);

  myRFID.AddicoreRFID_Init();  
}

void loop()
{
  uchar i, tmp, checksum1;
uchar status;
        uchar str[MAX_LEN];
        uchar RC_size;
        uchar blockAddr; //Selection operation block address 0 to 63
        String mynum = "";

        str[1] = 0x4400;
//Find tags, return tag type
status = myRFID.AddicoreRFID_Request(PICC_REQIDL, str);
if (status == MI_OK)
{
            Serial.println("RFID tag detected");
      
}

//Anti-collision, return tag serial number 4 bytes
status = myRFID.AddicoreRFID_Anticoll(str);
if (status == MI_OK)
{
            checksum1 = str[0] ^ str[1] ^ str[2] ^ str[3];
          
           Serial.print(str[0]);
           Serial.print(" , ");
       Serial.print(str[1]);
            Serial.print(" , ");
       Serial.print(str[2]);
           Serial.print(" , ");
       Serial.print(str[3]);
            Serial.print(" , ");
       Serial.print(str[4]);
            Serial.print(" , ");
            Serial.println(checksum1,BIN);
            
            Serial.println();
            delay(1000);
}
        myRFID.AddicoreRFID_Halt();   //Command tag into hibernation              

}

Tuesday, February 16, 2016

Playing Ultrasonic sensor with Arduino


Playing Ultrasonic sensor with Arduino


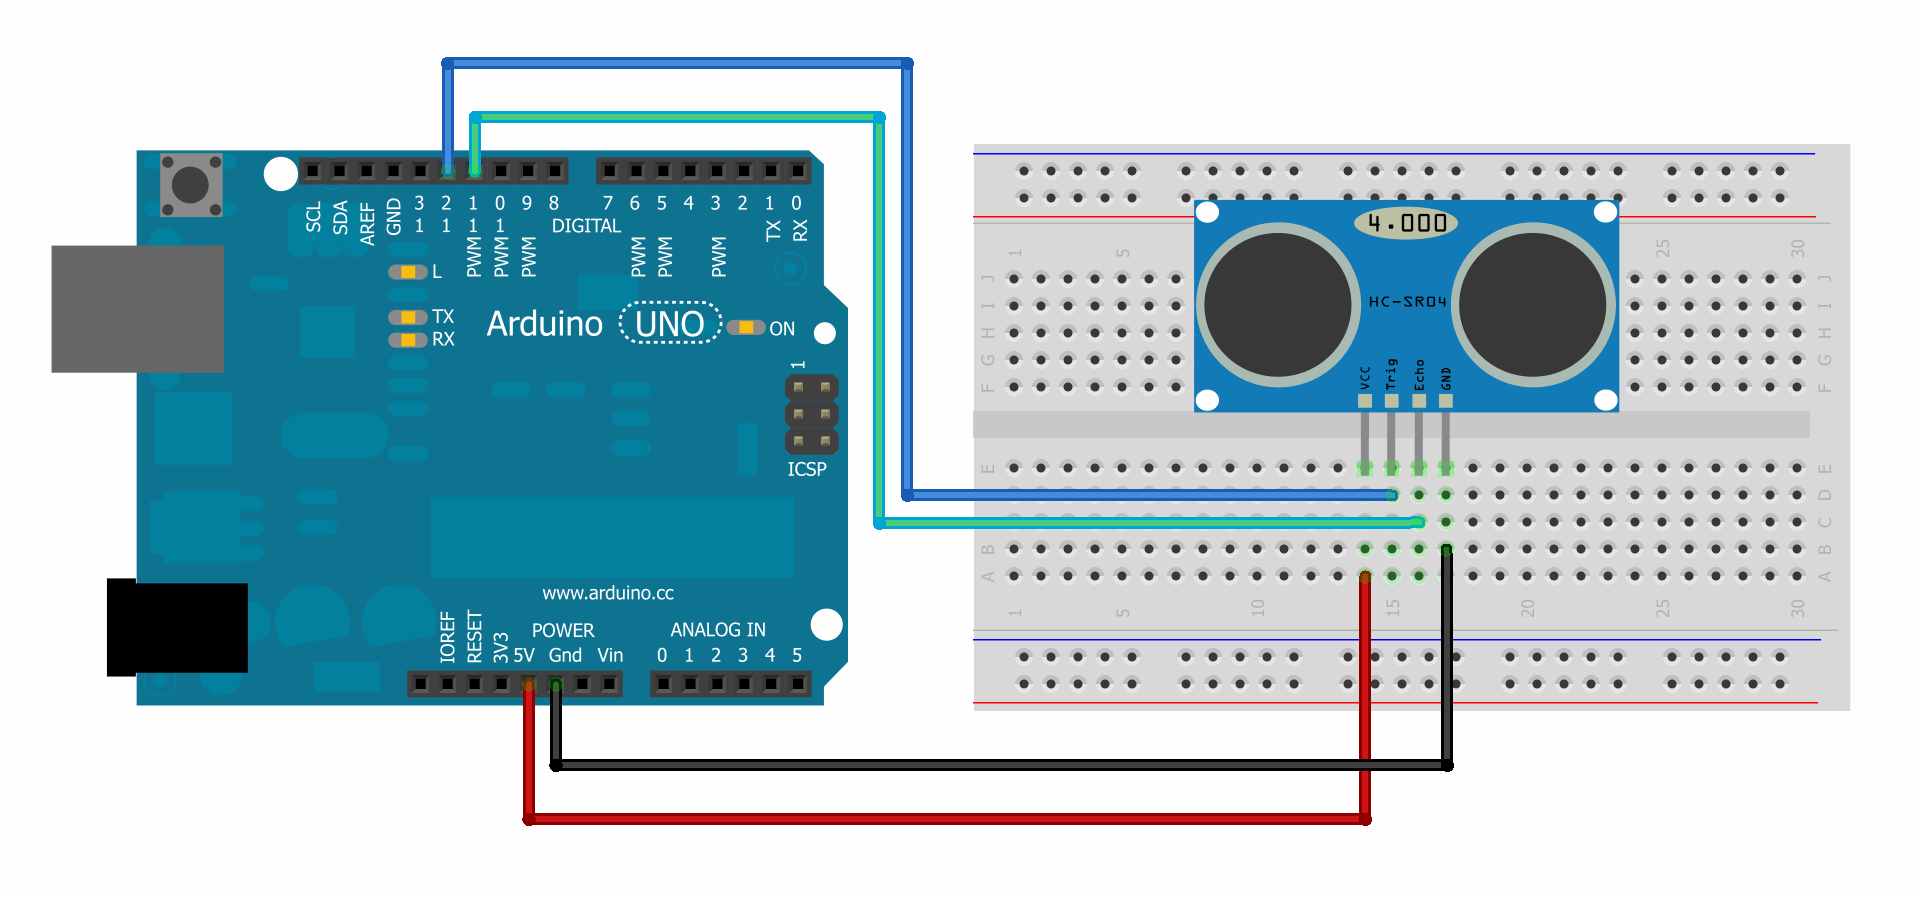
1. The Connection


1424201420-2wire_bb.png


2. The script

#define echopin 3
#define TRIGPIN 2

void setup()
{
  Serial.begin (9600);
  pinMode (echopin,INPUT);
  pinMode (TRIGPIN, OUTPUT);
}
void loop()

{ digitalWrite(TRIGPIN,LOW);
delayMicroseconds(2);
digitalWrite(TRIGPIN,HIGH);
delayMicroseconds(10);
digitalWrite(TRIGPIN,LOW);

float distance = pulseIn(echopin,HIGH);
distance = distance/46;
Serial.print (distance);
Serial.println (" cm");
if (distance < 10)
{
Serial.print("AWAS HATI-HATI");
Serial.println (" Jarak kurang dari 10 cm");
}
else if
 (distance < 20)
{
Serial.print("Waspada");
Serial.println (" Jarak kurang dari 20 cm");
}
else
{
  Serial.println ("Jarak Masih Aman");

}
delay (200);
}

playing with Gyro sensor GY-291 and Arduino


1. connection.


2. The Script

/* Include the standard wire library */
#include

/* Alternate I2C address of the module */
#define I2C_Add 0x53

/* ADXL345 register addresses */
#define POWER_CTL 0x2D
#define DATA_FORMAT 0x31
#define X_Axis 0x32
#define Y_Axis 0x34
#define Z_Axis 0x36

/* Accelerometer range modes */
#define RANGE_2g 0
#define RANGE_4g 1
#define RANGE_8g 2
#define RANGE_16g 3

void setup()
{
  /* Initialise the I2C bus */
  Wire.begin();  
  
  /* Initialise the serial interface */
  Serial.begin(9600);
  
  /* Initialise the ADXL345 */  
  Init_ADXL345(RANGE_2g);
}

/* Main program */
void loop()
{
  /* Continually read and output all 3 axis to the serial port */
  Serial.print("X: ");
  Serial.print(Read_Axis(X_Axis));
  
  Serial.print(" Y: ");
  Serial.print(Read_Axis(Y_Axis));
  
  Serial.print(" Z: ");
  Serial.println(Read_Axis(Z_Axis));
}

/* Read one of the 3 axis via the I2C interface */
int Read_Axis(byte axis)
{
  int Data;
   
  Wire.beginTransmission(I2C_Add); 
  Wire.write(axis); 
  Wire.endTransmission(); 
  
  Wire.beginTransmission(I2C_Add);
  Wire.requestFrom(I2C_Add, 2);
  
  /* If data is available then read it (2 bytes) */
  if(Wire.available())     
  { 
    Data = (int)Wire.read();
    Data = Data  | (Wire.read() << 8);
  }else
  {
    Data = 0;
  }
    
  Wire.endTransmission();  
  return Data;
}


/* Initialise the ADXL345 */
void Init_ADXL345(byte range)
{
  Wire.beginTransmission(I2C_Add);
  
  /* Set the sensitivity of the module */
  Wire.write(DATA_FORMAT); 
  Wire.write(range); 
  Wire.endTransmission(); 
  
  /* Put the module into measurement mode to start taking measurements */
  Wire.beginTransmission(I2C_Add);
  Wire.write(POWER_CTL); 
  Wire.write(0x08); 
  
  Wire.endTransmission(); 
}


Friday, February 5, 2016

Controlling arduino using serial openwrt

Controlling arduino using serial openwrt


1. Create sketch

// include the library code:
#include

// initialize the library with the numbers of the interface pins
LiquidCrystal lcd(7, 6, 5, 4, 3, 2);

void setup() {
  // set up the LCD's number of columns and rows:
  lcd.begin(16, 2);
  // initialize the serial communications:
  Serial.begin(9600);
}

void loop() {
  // when characters arrive over the serial port...
  if (Serial.available()) {
    // wait a bit for the entire message to arrive
    delay(100);
    // clear the screen
    lcd.clear();
    // read all the available characters
    while (Serial.available() > 0) {
      // display each character to the LCD
      lcd.write(Serial.read());
    }
  }
}

2. Upload the sketch
3. For testing the arduino ,open serial monitor, and type something.


4. Install modem driver on openwrt

root@OpenWrt:~# opkg install kmod-usb-serial kmod-usb-serial-ftdi

5. Attach Arduino to OpenWRT, and check on dmesg

[ 5182.260000] usb 1-1: new full-speed USB device number 3 using ehci-platform
[ 5182.430000] cdc_acm 1-1:1.0: ttyACM0: USB ACM device

6. Install coreutils-stty

root@OpenWrt:~# opkg install coreutils-stty

7. Add  this to /etc/rc.local before start
stty -F /dev/ttyACM0 4:0:18b2:0:0:0:0:0:1:0:0:0:0:0:0:0:0:0:0:0:0:0:0:0:0:0:0:0:
stty -F /dev/ttyACM0 9600 raw
=> Reboot router

8. Test from openwrt,

- open ssh to IP of openwrt
- type echo -en "Selamat Siang" > /dev/ttyACM0   than press enter.

9. Result on LCD screen.

Thursday, January 14, 2016

Playing with ESP8622

Playing with ESP8622


Pin Connection

ESP8622            USB-TTL

  GND     -------      GND
  VCC     -------      3.3V
  RX        -------       TX
  TX        -------        RX
 CH-PD  -------      3,3V

Open putty or serial communication software,


Sunday, December 6, 2015

Arduino with LCD


1. Create sketch

// include the library code:
#include

// initialize the library with the numbers of the interface pins
LiquidCrystal lcd(7, 6, 5, 4, 3, 2);

void setup() {
  // set up the LCD's number of columns and rows:
  lcd.begin(16, 2);
  // initialize the serial communications:
  Serial.begin(9600);
}

void loop() {
  // when characters arrive over the serial port...
  if (Serial.available()) {
    // wait a bit for the entire message to arrive
    delay(100);
    // clear the screen
    lcd.clear();
    // read all the available characters
    while (Serial.available() > 0) {
      // display each character to the LCD
      lcd.write(Serial.read());
    }
  }
}

2. Upload the sketch
3. open serial monitor, and type something.

Monday, November 23, 2015

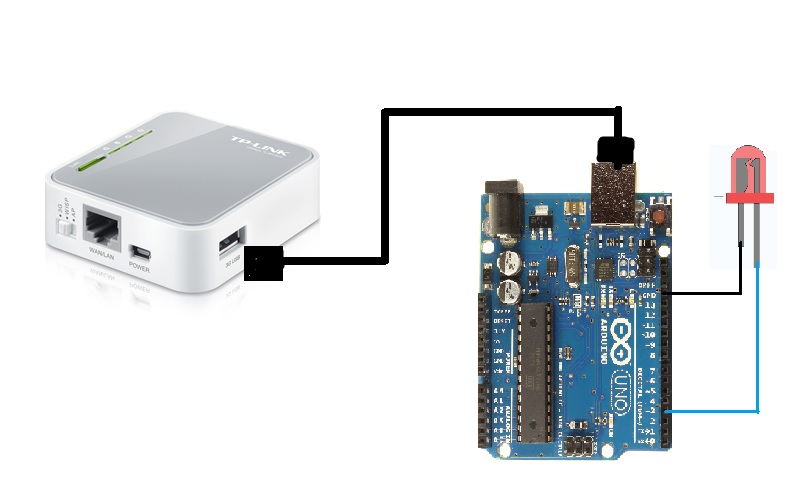
Control Led on Arduino using OpenWRT (TP Link MR-3020) serial com


1. Install modem driver on openwrt

root@OpenWrt:~# opkg install kmod-usb-serial kmod-usb-serial-ftdi

2. Attach Arduino to OpenWRT, and check on dmesg

[ 5182.260000] usb 1-1: new full-speed USB device number 3 using ehci-platform
[ 5182.430000] cdc_acm 1-1:1.0: ttyACM0: USB ACM device

3. Install coreutils-stty

root@OpenWrt:~# opkg install coreutils-stty

4. run coreutils

stty -F /dev/ttyACM0 cs8 9600 ignbrk -brkint -icrnl -imaxbel -opost -onlcr -isig -icanon -iexten -echo -echoe -echok -echoctl -echoke noflsh -ixon -crtscts

5. upload the sketch to Arduino.


int ledPin3 = 3;

int ledPin2 = 2;

int incomingByte;          // a variable to read incoming serial data into


void setup() {   

   Serial.begin(9600);     

   pinMode(ledPin3, OUTPUT);              

   pinMode(ledPin2, OUTPUT);              

}


void loop() {    

    if (Serial.available() > 0) {        // see if there's incoming serial data:

        incomingByte = Serial.read();     // read the oldest byte in the serial buffer

                                        //Preform the code to switch on or off the leds

        if (incomingByte == '1') {

            digitalWrite(ledPin3, HIGH);     //If the serial data is 0 turn LED 1 on

        }

        if (incomingByte == '2') {

            digitalWrite(ledPin3, LOW);     //If the serial data is 1 turn LED 1 off

        }

        if (incomingByte == '3') {

            digitalWrite(ledPin2, HIGH);     //If the serial data is 2 turn LED 2 on

        }

        if (incomingByte == '4') {

            digitalWrite(ledPin2, LOW);     //If the serial data is 3 turn LED 2 off

        }

    }

}

6. run this command on Openwrt terminal.

-- to turn on LedPin3

echo "1" >/dev/ttyACM0

-- to turn off Led 

echo "2" >/dev/ttyACM0


Image result for smiley face


Wednesday, November 11, 2015

Automatic Wifi Connection on Openwrt (MR3020)


1. Set MR3020 as Client and Master AP from luci menu,
     - As client of  APMaster1 and as APMaster -- save configuration with nama apmaster1, put in /etc/config folder.. and so on.

2. Create file /etc/init.d/wireless_auto

#!/bin/sh
#As client APMaster1
iwinfo wlan0 scan | grep "APMaster1" &> /dev/null
if [ $? == 0 ]; then
cp /etc/config/apmaster1 /etc/config/wireless
wifibssid=$(iwinfo wlan0 scan|grep "APMaster1" -B 1|head -n 1|awk '{print $NF'})
uci set wireless.@wifi-iface[0].bssid="$wifibssid"
uci commit wireless
        /etc/init.d/network reload ;

#As client APMaster2
elif [ $? == 1 ]; then
iwinfo wlan0 scan | grep "APMaster2" &> /dev/null
if [ $? == 0 ]; then
cp /etc/config/apmaster2/etc/config/wireless
wifibssid=$(iwinfo wlan0 scan|grep "APMaster2" -B 1|head -n 1|awk '{print $NF'})
        uci set wireless.@wifi-iface[0].bssid="$wifibssid"
        uci commit wireless
        /etc/init.d/network reload ;
#As APMaster
elif [ $? == 1 ]; then
cp /etc/config/APMaster /etc/config/wireless
fi
fi


2. Reboot.


Sunday, November 8, 2015

Basic input/output gpio pin GL-INET


1. Export first the gpio pin (example port 21), type command

echo "21" >/sys/class/gpio/export

2. Define gpio port 21 (example as output)

echo "out" >/sys/class/gpio//gpio21/direction

if as input type,

echo "in" >/sys/class/gpio//gpio21/direction


3. Fire up the led on gpio port 21

echo "1" >/sys/class/gpio/gpio21/value


Wednesday, November 4, 2015

Mounting USB on OpenWRT (barrier breaker)

langkah langkahnya


1. install driver
opkg update
opkg install kmod-usb-storage block-mount block-hotplug kmod-fs-ext4 kmod-fs-vfat kmod-nls-cp437 kmod-nls-iso8859-1
mkdir -p /mnt/usb
mount -t vfat /dev/sda1 /mnt/usb
 
22


Tuesday, November 3, 2015

Exroot OpenWRT on TPLink MR3020

Langkah langkah exroot

1. siapkan usb flashdisk, buat 2 partisi, partisi 1 buat swap file besarnya 500M saja,
   partisi 2 jenisnya ext4 besarnya sisa dari partisi yg ada.
2. siapkan MR3020 dengan firmware barrier breaker dan sudah tersetting konek ke internet.
3. masuk ssh ke ip router
4. ketik perintah update
opkg update
5. install driver usb storage
opkg install block-mount kmod-usb-storage kmod-fs-ext4

kalau ada error
kmod: failed to insert /lib/modules/3.10.49/ext4.ko
biarin aja

6. reboot
7. cek apakah usbnya sudah terdeteksi

root@OpenWrt:~# dmesg|grep sda
[   10.410000] sd 0:0:0:0: [sda] 15820800 512-byte logical blocks: (8.10 GB/7.54 GiB)
[   10.410000] sd 0:0:0:0: [sda] Write Protect is off
[   10.420000] sd 0:0:0:0: [sda] Mode Sense: 43 00 00 00
[   10.430000] sd 0:0:0:0: [sda] No Caching mode page found
[   10.430000] sd 0:0:0:0: [sda] Assuming drive cache: write through
[   10.450000] sd 0:0:0:0: [sda] No Caching mode page found
[   10.450000] sd 0:0:0:0: [sda] Assuming drive cache: write through
[   10.480000]  sda: sda1 < sda5 sda6 >
[   10.510000] sd 0:0:0:0: [sda] No Caching mode page found
[   10.510000] sd 0:0:0:0: [sda] Assuming drive cache: write through
[   10.520000] sd 0:0:0:0: [sda] Attached SCSI removable disk

8. install paket untuk exroot
opkg install block-mount kmod-fs-ext4 kmod-usb-storage kmod-usb-ohci

9. cek partisi yg ada di flash disk
block info

root@OpenWrt:~# block info
/dev/mtdblock2: UUID="20ad40ea-d33a421e-785b7d2d-ada99230" VERSION="4.0" TYPE="squashfs"
/dev/mtdblock3: TYPE="jffs2"
/dev/sda1: VERSION="2" TYPE="swap"
/dev/sda2: UUID="f5e53d37-b516-d101-70e5-3d37b516d101" NAME="EXT_JOURNAL" VERSION="1.0" TYPE="ext4"

yg sda1 --> swap  yg sda2 --> ext4

10. copy file system ke sda2

langkah langkahnya

mkdir -p /mnt/sda2
mount /dev/sda2 /mnt/sda2
mkdir -p /tmp/cproot
mount --bind / /tmp/cproot
tar -C /tmp/cproot -cvf - . | tar -C /mnt/sda2 -xf -
umount /tmp/cproot
umount /mnt/sda2

11. Buat router boot melalui flashdisk

Jalankan perintah ini

block detect > /etc/config/fstab


Edit file /etc/config/fstab

config global
        option anon_swap '0'
        option anon_mount '0'
        option auto_swap '1'
        option auto_mount '1'
        option delay_root '5'
        option check_fs '0'

config swap
        option device '/dev/sda1'
        option enabled '1'

config mount
        option target '/'
        option uuid '78e2ef58-6318-d101-7022-e4586318d101'
        option enabled '1'

11. reboot

12. cek

root@OpenWrt:~# df -h
Filesystem                Size      Used Available Use% Mounted on
rootfs                    5.5G     16.0E      5.2G 100% /
/dev/root                 2.3M      2.3M         0 100% /rom
tmpfs                    14.1M    564.0K     13.5M   4% /tmp
/dev/sda2                 5.5G     16.0E      5.2G 100% /
tmpfs                   512.0K         0    512.0K   0% /dev

root@OpenWrt:~# mount
rootfs on / type rootfs (rw)
/dev/root on /rom type squashfs (ro,noatime)
proc on /proc type proc (rw,noatime)
sysfs on /sys type sysfs (rw,noatime)
tmpfs on /tmp type tmpfs (rw,nosuid,nodev,noatime)
/dev/sda2 on / type ext4 (rw,relatime,data=ordered)
tmpfs on /dev type tmpfs (rw,relatime,size=512k,mode=755)
devpts on /dev/pts type devpts (rw,relatime,mode=600)
debugfs on /sys/kernel/debug type debugfs (rw,noatime)


13. DONE!

Sunday, April 28, 2013

Blocking Porn on Network using Squid

Here the step blocking porn site using squid


I assumed that the squid proxy run well,

the step :
Open the squid.conf

add the script :


and add the script :

http_access deny porn on the top of  http_access allow manager localhost

 create the file and name it wordblock.txt in /etc/squid folder


after that pres Ctrl+X than save


change the owner of that file

#chown proxy:proxy /etc/squid/wordblock.txt

make permittion to allow to execute that file

#chmod +x /etc/squid/wordblock.txt

after that restrat your squid


Tuesday, November 13, 2012

whitening tooth

Whitening Tooth Using Photoshop

Here is the step

1. Choose Brush tools
2. Set Mode to Saturation
3. Set Opacity 37%
4. Set appropriate Brush size
5. Switch Foreground to white
6. Goodluck